
Amazon SQS/SNS Configuration

MassTransit combines Amazon SQS (Simple Queue Service) with SNS (Simple Notification Service) to provide both send and publish support.
Amazon SQS
Section titled “Amazon SQS”Amazon Simple Queue Service (SQS) is a fully managed message queuing service that enables you to decouple and scale microservices, distributed systems, and serverless applications. SQS eliminates the complexity and overhead associated with managing and operating message-oriented middleware and empowers developers to focus on differentiating work.
With SQS, you can send, store, and receive messages between software components at any volume, without losing messages or requiring other services to be always available. SQS makes it simple and cost-effective to decouple and coordinate the components of a cloud application.
SQS offers two types of queues, Standard and FIFO (First-In-First-Out). Standard queues offer best-effort ordering, which ensures that messages are generally delivered in the order in which they are sent. FIFO queues guarantee that messages are processed exactly once, in the order that they are sent, and they are designed to prevent duplicates.
Amazon SNS
Section titled “Amazon SNS”Amazon Simple Notification Service (SNS) is a fully managed messaging service that enables you to send messages to multiple subscribers or endpoints. SNS supports multiple protocols including HTTP, HTTPS, email, and Lambda, and it can be used to send push notifications to mobile devices or to process messages asynchronously using AWS Lambda.
SNS allows you to send a message to a “topic” which is a logical access point and communication channel. Subscribers can then subscribe to that topic to receive the messages.
SNS also provides a feature called fan-out delivery, which enables messages to be delivered to multiple subscribers in parallel, this allows SNS to handle high-throughput and burst traffic, and can improve the overall performance of your application.
MassTransit uses SNS to route published messages to SQS queues.
Configuring a Receive endpoint will use the message topology to create and subscribe SNS topics to SQS queues so that published messages will be delivered to the Receive endpoint queue.
Configure Amazon SQS
Section titled “Configure Amazon SQS”In the example below, the Amazon SQS host settings are configured. The configuration includes:
namespace AmazonSqsConsoleListener;
using System.Threading.Tasks;using MassTransit;using Microsoft.Extensions.Hosting;
public class Program{ public static async Task Main(string[] args) { await Host.CreateDefaultBuilder(args) .ConfigureServices((hostContext, services) => { services.AddMassTransit(x => { x.UsingAmazonSqs((context, cfg) => { cfg.Host("us-east-2", h => { h.AccessKey("your-iam-access-key"); h.SecretKey("your-iam-secret-key"); }); }); }); }) .Build() .RunAsync(); }}- The Amazon SQS host
- Region name:
us-east-2 - Access key and secret key used to access the resources
- Region name:
Amazon SQS host settings
Section titled “Amazon SQS host settings”| Property | Description |
|---|---|
| Region | The AWS Region |
| Scope | Will be used as a prefix for queue/topic name |
| AccessKey | Access Key |
| SecretKey | Access Secret |
Amazon SQS transport options
Section titled “Amazon SQS transport options”All AWS SQS transport options can be configured using the .Host() method. The most commonly used settings can be configured via transport options.
services.AddOptions<AmazonSqsTransportOptions>() .Configure(options => { // configure options manually, but usually bind them to a configuration section });Configure SQS Redrive Policy
Section titled “Configure SQS Redrive Policy”MassTransit can configure an Amazon SQS redrive policy directly on a Receive endpoint. When enabled, MassTransit will:
- Use the endpoint’s
_errorqueue as the dead-letter queue (DLQ) - Ensure that the error queue exists in topology
- Apply/update the source queue
RedrivePolicywith:deadLetterTargetArn= error queue ARNmaxReceiveCount= configured delivery count
Configure the redrive policy
Section titled “Configure the redrive policy”To configure the redrive policy on a Receive endpoint, use the EnableRedrivePolicy method.
cfg.ReceiveEndpoint("order-events", e =>{ e.EnableRedrivePolicy(5);});To configure the redrive policy on all Receive endpoints, use the EnableRedrivePolicy method in the ConfigureEndpoints callback.
e.AddConfigureEndpointCallback((_, configurator) =>{ if (configurator is IAmazonSqsReceiveEndpointConfigurator sqs) sqs.EnableRedrivePolicy(5);});Configure AWS SDK retries
Section titled “Configure AWS SDK retries”In containerized environments where many service instances can start at once, API calls like sns:ListTopics may be throttled at the account/region level.
MassTransit uses the AWS SDK clients, so you can tune retry behavior without changing application code by setting AWS SDK environment variables.
AWS SDK for .NET retry behavior is documented here:
https://docs.aws.amazon.com/sdk-for-net/v4/developer-guide/retries-timeouts.html
Set the following environment variables in your container/task definition:
AWS_RETRY_MODE=standardAWS_MAX_ATTEMPTS=10(or higher, such as 20, for heavily parallel startup scenarios)
Example:
AWS_RETRY_MODE=standardAWS_MAX_ATTEMPTS=20If no retry mode is specified, the AWS SDK defaults to legacy retry behavior. Increasing retry attempts can reduce startup failures caused by temporary throttling during burst restarts (for example, spot instance recycling).
Configure a service scope
Section titled “Configure a service scope”Because there is only ever one “SQS/SNS” per AWS account, it can be helpful to scope a service’s queues and topics. This will prefix all SQS queues and SNS topics with scope value.
services.AddMassTransit(x =>{    x.UsingAmazonSqs((context, cfg) =>    {        cfg.Host("us-east-2", h =>        {            h.AccessKey("your-iam-access-key");            h.SecretKey("your-iam-secret-key");
            // specify a scope for all topics            h.Scope("dev", true);        });
        // additionally include the queues        cfg.ConfigureEndpoints(context, new DefaultEndpointNameFormatter("dev-", false));    });});
Configure tests using Localstack
Section titled “Configure tests using Localstack”You can use Localstack to run tests locally without having to create AWS resources. Localstack is a fully functional local AWS cloud stack that runs in Docker. It emulates all the AWS services that you’d normally use during development and testing.
To configure MassTransit to use Localstack, call the LocalstackHost() method instead of Host().
services.AddMassTransit(x =>{    x.UsingAmazonSqs((context, cfg) =>    {        cfg.LocalstackHost();
        cfg.ConfigureEndpoints(context);    });});
Example IAM Policy
Section titled “Example IAM Policy”{ "Version": "2012-10-17", "Statement": [ { "Sid": "SqsAccess", "Effect": "Allow", "Action": [ "sqs:SetQueueAttributes", "sqs:ReceiveMessage", "sqs:CreateQueue", "sqs:DeleteMessage", "sqs:SendMessage", "sqs:GetQueueUrl", "sqs:GetQueueAttributes", "sqs:ChangeMessageVisibility", "sqs:PurgeQueue", "sqs:DeleteQueue", "sqs:TagQueue" ], "Resource": "arn:aws:sqs:*:YOUR_ACCOUNT_ID:*" }, { "Sid": "SnsAccess", "Effect": "Allow", "Action": [ "sns:GetTopicAttributes", "sns:ListSubscriptionsByTopic", "sns:GetSubscriptionAttributes", "sns:SetSubscriptionAttributes", "sns:CreateTopic", "sns:Publish", "sns:Subscribe" ], "Resource": "arn:aws:sns:*:YOUR_ACCOUNT_ID:*" }, { "Sid": "SnsListAccess", "Effect": "Allow", "Action": [ "sns:ListTopics" ], "Resource": "*" } ]}Configure an SNS subscription
Section titled “Configure an SNS subscription”Any topic can be subscribed to a Receive endpoint, as shown below. The topic attributes can also be configured, in case the topic needs to be created.
services.AddMassTransit(x =>{    x.UsingAmazonSqs((context, cfg) =>    {        cfg.Host("us-east-2", h =>        {            h.AccessKey("your-iam-access-key");            h.SecretKey("your-iam-secret-key");        });
        cfg.ReceiveEndpoint("input-queue", e =>        {            // disable the default topic binding            e.ConfigureConsumeTopology = false;
            e.Subscribe("event-topic", s =>            {                // set topic attributes                s.TopicAttributes["DisplayName"] = "Public Event Topic";                s.TopicSubscriptionAttributes["some-subscription-attribute"] = "some-attribute-value";                s.TopicTags.Add("environment", "development");            });        });    });});
Default broker topology
Section titled “Default broker topology”With SQS/SNS, which supports topics and queues, messages are sent or published to SNS Topics and then routes those messages through subscriptions to the appropriate SQS Queues.
When the bus is started, MassTransit will create SNS Topics and SQS Queues for the Receive endpoint.
The following messages are used in this example:
Here is the command contract for processing a file that was received:
namespace Acme;
public record ProcessFile{}
These are the event contracts for a consumer that receives files from a customer:
namespace Acme;
public record FileReceivedEvent{}
The consumers for these message contracts are shown below:
class ProcessFileConsumer :    IConsumer<ProcessFile>{}
class FileReceivedConsumer :    IConsumer<FileReceivedEvent>{}
class CustomerAuditConsumer : IConsumer<FileReceivedEvent>{}These are the exchanges and queues for the example above when Sending a message:

Publish
Section titled “Publish”These are the topics and queues for the example above when Publishing a message:

These are the exchanges and queues used when messages fail. The failing message gets forwarded to an _error queue by default. The following diagram shows
which exchanges and queues are used when a message fails to be processed and is deadlettered for the example above.

Go to Exceptions to learn more on exception and faults
Retry messages
Section titled “Retry messages”Faulted messages by default are forwarded to the corresponding *_error queue:
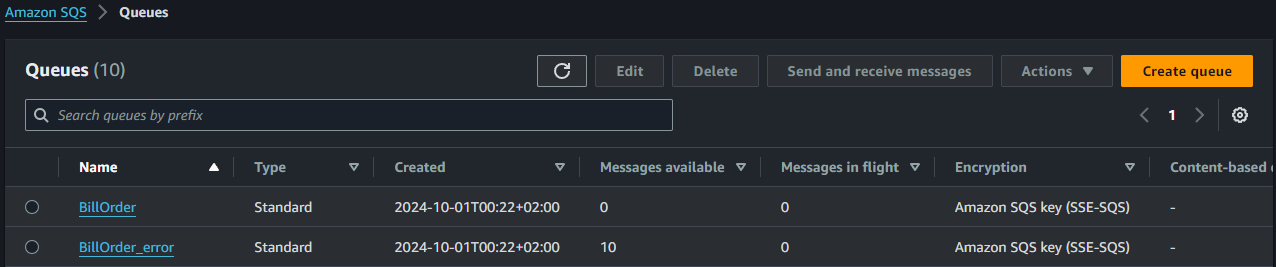
Messages can be inspected by:
- Selecting the queue
- Selecting
Send and receive messages - In the Receive messages panel, select
Poll for messages
A list of messages appears, and a message can be inspected by clicking it:
Configure the consumer queue its dead-letter queue:
- Select a consumer queue, for example
BillOrder - Select
Editin the Dead-letter queue panel - Enable
Set this queue to receive undeliverable messagesin the Dead-letter queue panel - Select the corresponding consumer queue (here
arn:aws:sqs:***:***:BillOrder_error) - Select
Save
The _error dead-letter needs to be configured to set a re-drive (return) queue;
- Select a consumer
_errorqueue, for exampleBillOrder_error - Select
Editin the Dead-letter queue panel - Enable the Redrive allow policy panel
- Select
By queue - Select the consumer queue, for example
BillOrder(herearn:aws:sqs:***:***:BillOrder) - Select
Save
The Start DLQ redrive button in the upper-right corner should now be enabled.
AmazonSQS isn’t aware that MassTransit forwarded the messages currently in the queue from another queue unless it actually forwarded the messages itself because the delivery count was exceeded. This requires the following steps to set a custom destination:
- Select
Start DLQ redrive - Select
Redrive to a custom destination - Select the correct consumer queue, for example
BillOrder - Scroll down and select one or more messages
- Select
DLQ redrivein the lower-right corner